To install LAMP in your jaunty or infact any linux distro...these steps may come in handy. But i suggest you go through the entire process before you start working on them as this might give you a better insight on getting LAMP installed efficiently
Steps for installing LAMP
sudo apt-get install apache2
sudo apt-get install php5
sudo apt-get install mysql-server
Note this could cause problems such as
roshan@roshan:~$ sudo apt-get install mysql-server
Reading package lists... Done
Building dependency tree
Reading state information... Done
The following packages were automatically installed and are no longer required:
libclucene0ldbl libgtkhtml3.8-15 libqt4-opengl kdebase-runtime-data-common
postfix mysql-gui-tools-common librasqal1 kdelibs5-data libao2
libstreamanalyzer0 cdrdao bsd-mailx libstreams0 mailx portmap
kdebase-runtime-data
Use 'apt-get autoremove' to remove them.
The following extra packages will be installed:
libdbd-mysql-perl libdbi-perl libnet-daemon-perl libplrpc-perl
mysql-client-5.0 mysql-server-5.0 mysql-server-core-5.0
Suggested packages:
dbishell mysql-doc-5.0 tinyca
The following NEW packages will be installed:
libdbd-mysql-perl libdbi-perl libnet-daemon-perl libplrpc-perl
mysql-client-5.0 mysql-server mysql-server-5.0 mysql-server-core-5.0
0 upgraded, 8 newly installed, 0 to remove and 2 not upgraded.
Need to get 0B/35.8MB of archives.
After this operation, 110MB of additional disk space will be used.
Do you want to continue [Y/n]? y
Preconfiguring packages ...
Selecting previously deselected package libnet-daemon-perl.
(Reading database ... 184316 files and directories currently installed.)
Unpacking libnet-daemon-perl (from .../libnet-daemon-perl_0.43-1_all.deb) ...
Selecting previously deselected package libplrpc-perl.
Unpacking libplrpc-perl (from .../libplrpc-perl_0.2020-1_all.deb) ...
Selecting previously deselected package libdbi-perl.
Unpacking libdbi-perl (from .../libdbi-perl_1.607-1_i386.deb) ...
Selecting previously deselected package libdbd-mysql-perl.
Unpacking libdbd-mysql-perl (from .../libdbd-mysql-perl_4.008-1_i386.deb) ...
Selecting previously deselected package mysql-client-5.0.
Unpacking mysql-client-5.0 (from .../mysql-client-5.0_5.1.30really5.0.75-0ubuntu10.2_i386.deb) ...
Selecting previously deselected package mysql-server-core-5.0.
Unpacking mysql-server-core-5.0 (from .../mysql-server-core-5.0_5.1.30really5.0.75-0ubuntu10.2_i386.deb) ...
Unpacking mysql-server-5.0 (from .../mysql-server-5.0_5.1.30really5.0.75-0ubuntu10.2_i386.deb) ...
Aborting downgrade from (at least) 5.1 to 5.0.
dpkg: error processing /var/cache/apt/archives/mysql-server-5.0_5.1.30really5.0.75-0ubuntu10.2_i386.deb (--unpack):
subprocess pre-installation script returned error exit status 1
Selecting previously deselected package mysql-server.
Unpacking mysql-server (from .../mysql-server_5.1.30really5.0.75-0ubuntu10.2_all.deb) ...
* Stopping MySQL database server mysqld [ OK ]
Processing triggers for man-db ...
Errors were encountered while processing:
/var/cache/apt/archives/mysql-server-5.0_5.1.30really5.0.75-0ubuntu10.2_i386.deb
E: Sub-process /usr/bin/dpkg returned an error code (1)
Its a serious downgrade problem:
After running the above command:
sudo rm -rf /var/lib/mysql
sudo apt-get install mysql-server-5.0
sudo apt-get install libapache2-mod-auth-mysql
sudo apt-get install php5-mysql
sudo apt-get install phpmyadmin
Now, after the installation is finished, we will check this, whether already installed correctly or not. Checking is as follows :
1. Restart your apache server : sudo /etc/init.d/apache2 restart
2. Check the apache service via the browser, type the following address : http://localhost
3. Check PHP whether the services are integrated correctly or not. This can be done by creating an index.php file in /var/www /. The program to be put into this file is:
Save, and open the browser and run http://localhost/index.php
If you get an output which contains the version of PHP your are using in a somewhat purple colored background..then PHP is working
4. Check Mysql whether the services are integrated with PHP or not. Create any file with .php file extension in /var/www/. The program is:
After saving, open the file in the browser as http://localhost/filename.php.
If successful, then a post appears which indicates that PHP and Mysql are integrated successfully0. If any posts appear to fail, then the PHP and Mysql has not been properly integrated.
5.Check phpmyadmin (optional) whether or not already running. Go to the following address in the browser:
http://localhost/phpmyadmin
Enter root for the user, while the password does not need to fill in, because the default password Mysql installation has not been set, so do not need a password. If successful the log, phpmyadmin already installed correctly.
If you still encounter some problems...drop in here as your comments....We'll sort it out
Friday, July 17, 2009
Monday, April 20, 2009
Updgrading to Ubuntu 9.04 Jaunty Jackalope
How do you upgrade from previous version of ubuntu to
Jaunty Jackalope
Today while I am writing in this blog... my system is being upgraded to 9.04 Jaunty Jackalope.
I'll explain briefly whats to be done and then i'll give the commands in case you are a newbie or you have some doubts
Before an upgradation check your sources.list file and modify it by replacing the current distro name to Jaunty Jackope. If this is not done properly then your upgradation will fail.
After modifying the sources.list, run update-manager -d and you'll get update manager where you'll be notified about the 9.04 release and you can upgrade from there.
Now i'll post all the commands that are required from the beginning till the end of the upgradation.
1) Type "sudo gedit /etc/apt/sources.list" in the terminal without quotes.
and change all the distro names to Jaunty jackalope i.e if you are using Intrepid Ibex, you'll find this name in the file at many places. Just change them to Jaunty Jackalope.
Sometimes you may find difficulty in changing the names everywhere and end up making a mess. Alternatively you can copy this code from here. You can replace the entire code with this code
After making changes save it and close it.
2) Go to your applications manager by pressing Alt+F2 and type update manager -d and then Run the application by clicking on Run

3) After this you'll be notified of the upgrading to 9.04. Click on Upgrade

4) A new window with the release notes opens with confirming your request. Click Upgrade

If you see in the above release notes.. its only an RC. The procedure is same for the final release as well. The RC is not recommended for production systems.
5) Then immediately it'll start downloading the upgrade tool

6) It'll start preparing to upgrade

7) You might get a message that third party sources are disabled. Just click close and continue the process

8) Next it starts setting new channels for iinstallation

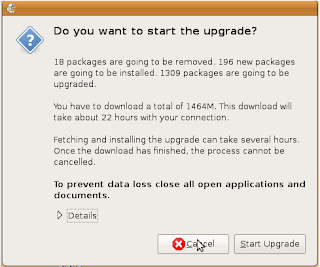
9) Now it asks whether you want to upgrade by downloading the packages

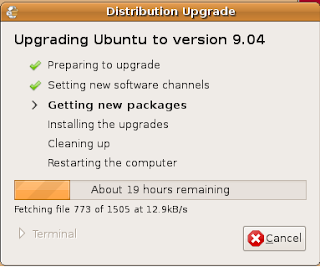
10) Now it starts downloading the packages required for upgrade

Jaunty Jackalope
Today while I am writing in this blog... my system is being upgraded to 9.04 Jaunty Jackalope.
I'll explain briefly whats to be done and then i'll give the commands in case you are a newbie or you have some doubts
Before an upgradation check your sources.list file and modify it by replacing the current distro name to Jaunty Jackope. If this is not done properly then your upgradation will fail.
After modifying the sources.list, run update-manager -d and you'll get update manager where you'll be notified about the 9.04 release and you can upgrade from there.
Now i'll post all the commands that are required from the beginning till the end of the upgradation.
1) Type "sudo gedit /etc/apt/sources.list" in the terminal without quotes.
and change all the distro names to Jaunty jackalope i.e if you are using Intrepid Ibex, you'll find this name in the file at many places. Just change them to Jaunty Jackalope.
Sometimes you may find difficulty in changing the names everywhere and end up making a mess. Alternatively you can copy this code from here. You can replace the entire code with this code
After making changes save it and close it.
2) Go to your applications manager by pressing Alt+F2 and type update manager -d and then Run the application by clicking on Run

3) After this you'll be notified of the upgrading to 9.04. Click on Upgrade

4) A new window with the release notes opens with confirming your request. Click Upgrade

If you see in the above release notes.. its only an RC. The procedure is same for the final release as well. The RC is not recommended for production systems.
5) Then immediately it'll start downloading the upgrade tool

6) It'll start preparing to upgrade

7) You might get a message that third party sources are disabled. Just click close and continue the process

8) Next it starts setting new channels for iinstallation

9) Now it asks whether you want to upgrade by downloading the packages

10) Now it starts downloading the packages required for upgrade

Wednesday, April 15, 2009
Ubuntu 9.04
Ubuntu 9.04 code named "Jaunty Jackalope" scheduled to release on 23rd April 2009 has a lot of promises for Ubuntu users....
Saturday, April 11, 2009
How to view system resources in Ubuntu
press Alt+F2 and then you'll get a RUN APPLICATION

then type gnome-system-monitor and ten press ENTER or click RUN

Then you'll get the system monitor

What you see right now in the above pic is the list of processes running on the system
If you want to see the CPU and NETWORK histories/consumption then go to the RESOURCES tab

Thats it... you can do anything you like..END unwanted processes and thus increase CPU utilization in a better way..

then type gnome-system-monitor and ten press ENTER or click RUN

Then you'll get the system monitor

What you see right now in the above pic is the list of processes running on the system
If you want to see the CPU and NETWORK histories/consumption then go to the RESOURCES tab

Thats it... you can do anything you like..END unwanted processes and thus increase CPU utilization in a better way..
Tuesday, February 10, 2009
Accessing Windows Directories from Linux
If you try to access Windows directories which is installed in a seperate disk or is in dual boot with Linux, then you might get an error stating that you would need to mount the disk..
Ubuntu automatically mounts all these disks..though there where some reports from Intrepid Ibex (Ubuntu 8.10) that there was a mounting problem.
If you want to mount then try these procedures:
1) go the terminal and type these commands
sudo apt-get update
sudo apt-get install ntfs-3g
sudo apt-get install ntfs-config
sudo apt-get install ntfsprogs
2) now try accessing the Windows directories..
3) If you are still unable to mount the files or you are unable to access them, then one main problem could be that you would not have shut down Windows the last time properly. This could be solved in two ways
a) Boot to Windows and shut it down properly
OR
b) Open the terminal and type these commands:
sudo ntfsfix /dev/sda1
sudo mount -a
df -h
4) Now try again.......If the problem still exists report here...I'll try finding another alternative
Sunday, February 8, 2009
Subscribe to:
Comments (Atom)


